virtio学习
本文涉及到virtio的规范、原理和使用。 # virtio
virtio是半虚拟化的解决方案,对半虚拟化Hypervisor的一组通用I/O设备的抽象。它提供了一套上层应用与各
Hypervisor
虚拟化设备(KVM,Xen,VMware等)之间的通信框架和编程接口,减少跨平台所带来的兼容性问题,大大提高驱动程序开发效率。
在完全虚拟化的解决方案中,guest VM 要使用底层 host 资源,需要 Hypervisor 来截获所有的请求指令,然后模拟出这些指令的行为,这样势必会带来很多性能上的开销。半虚拟化通过底层硬件辅助的方式,将部分没必要虚拟化的指令通过硬件来完成,Hypervisor 只负责完成部分指令的虚拟化,要做到这点,需要 guest 来配合,guest 完成不同设备的前端驱动程序,Hypervisor 配合 guest 完成相应的后端驱动程序,这样两者之间通过某种交互机制就可以实现高效的虚拟化过程。
由于不同 guest 前端设备其工作逻辑大同小异(如块设备、网络设备、PCI设备、balloon驱动等),单独为每个设备定义一套接口实属没有必要,而且还要考虑扩平台的兼容性问题,另外,不同后端 Hypervisor 的实现方式也大同小异(如KVM、Xen等),这个时候,就需要一套通用框架和标准接口(协议)来完成两者之间的交互过程,virtio 就是这样一套标准,它极大地解决了这些不通用的问题。 virtio spec 由 OASIS 维护,目前已经更新到 virtio v1.1。
virtio原理
virtio规范
VirtIO驱动定义了一组规范,只要guest和host按照此规范进行数据操作,就可以使虚拟机IO绕过内核空间而直接再用户空间的两个进程间传输数据,以此达到提高IO性能的目的。
VirtIO驱动的实现可以有很多种,最广泛的就是VirtIO Over PCI Bus,其它实现:VirtIO Over MMIO和VirtIO Over Channel IO,这里介绍 virtio PCI BUS。
VirtIO设备必须具备以下几个功能组件:
设备状态域
特性标志位
设备配置空间
设备状态域
VirtIO设备的初始化必须按照以下步骤顺序进行才被认为被识别:
- 重启设备。
- 标记ACKNOWLEDGE状态标志位,表示客户机发现了此设备。
- 标记DRIVER状态标志位,表示客户机知道怎么驱动这个设备。
- 读取设备特性标志位并给VirtIO设备设置特性标志,在此阶段,驱动可以读取特定设备相关的一些域的数据,驱动依赖检查自己是否支持这些特性,如果支持,就采纳之。
- 设置FEATURES_OK状态标志位,此阶段之后,驱动就不能再采纳新的特性了。
- 再次读取设备状态,确认FEATURES_OK标志已经被设备成功:如果没有被设置成功,表示这个设备不支持该特性,设备无法就无法使用。
- 执行具体设备的设置操作:包括扫描设备关联的virtqueues,总线设置,如果是VirtIO over PCI还需要写设备的VirtIO配置空间,还有virtqueues的使能以及运用。
- 最后标记DRIVER_OK状态标志位,自此VirtIO设备就初始化完成,可以使用了。
特性标志位
每个VirtIO设备都需要支持各种特性。在设备初始化阶段,驱动读取这个特性标志,然后通知VirtIO设备驱动可以接受的特性子集。
设备配置空间
设备配置空间,通常用于配置不常变动的参数,或者初始化阶段设置的参数。
特性标志位包含表示配置空间是否存在的bit位,后面的版本会通过在特性标志位的末尾新添新的bit位来扩展配置空间。
virtio的架构
virto由大神Rusty Russell编写(现已转向区块链了。。。),是在Hypervisor之上的抽象API接口,客户机需要知道自己运行在虚拟化环境中,进而根据virtio标准和Hypervisor协作,提高客户机的性能(特别是I/O性能)。
前端驱动(Front-end driver)是在客户机中存在的驱动程序模块,而后端处理器程序(Back-end driver)是在QEMU中实现的。
virtio是半虚拟化驱动的方式,其I/O性能几乎可以达到和native差不多的I/O性能。但是virtio必须要客户机安装特定的virtio驱动使其知道是运行在虚拟化环境中,并按照virtio的规定格式进行数据传输。
Linux2.6.24及其以上版本的内核都支持virtio。由于virtio的后端处理程序是在位于用户空间的QEMU中实现的,所以宿主机中只需要比较新的内核即可,不需要特别地编译与virtio相关地驱动。但是客户机需要有特定地virtio驱动程序支持,以便客户机处理I/O操作请求时调用virtio驱动。
层次结构
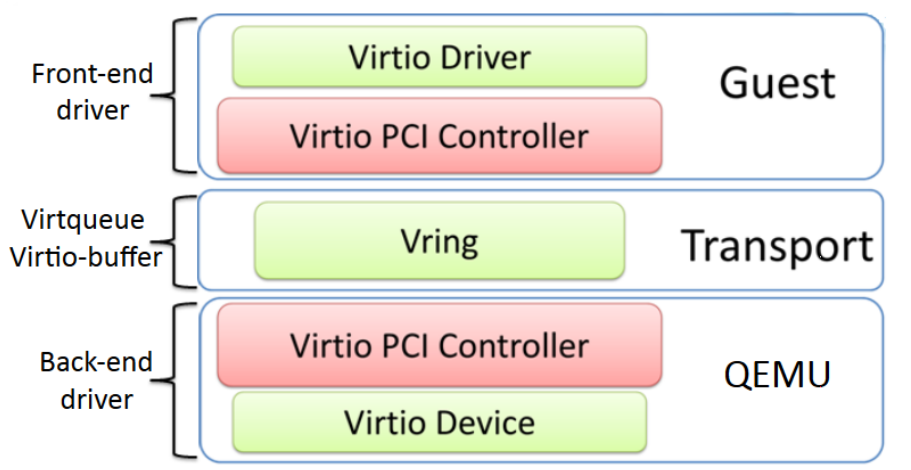
每一个virtio设备(例如:块设备或网卡),在系统层面看来,都是一个pci设备。
PCI设备标识的Vendor ID 0x1AF4
(PCI_VENDOR_ID_REDHAT_QUMRANET), and Device ID
0x1000 through 0x107F 都是virtio device,其中
0x1000 through 0x103F 为legacy device,而
0x1040 through 0x107F 为 modern device。分别见
drivers/virtio/virtio_pci_legacy.c 和
drivers/virtio/virtio_pci_modern.c。
1
2
3
4
5
6
/* drivers/virtio/virtio_pci_common.c */
/* Qumranet donated their vendor ID for devices 0x1000 thru 0x10FF. */
static const struct pci_device_id virtio_pci_id_table[] = {
{ PCI_DEVICE(PCI_VENDOR_ID_REDHAT_QUMRANET, PCI_ANY_ID) },
{ 0 }
};
这些设备之间,有共性部分,也有差异部分。 1. 共性部分:
这些设备都需要挂接相应的buffer队列操作 virtqueue_ops
,都需要申请若干个buffer队列,当执行io输出时,需要向队列写入数据;都需要执行
pci_iomap()
将设备配置寄存器区间映射到内存区间;都需要设置中断处理;等中断来了,都需要从队列读出数据,并通知虚拟机系统,数据已入队。
- 差异部分: 设备中系统中,如何与业务关联起来。各个设备不相同。例如,网卡在内核中是一个net_device,与协议栈系统关联起来。同时,向队列中写入什么数据,数据的含义如何,各个设备不相同。队列中来了数据,是什么含义,如何处理,各个设备不相同。
如果每个virtio设备都完整实现自己的功能,又会形成浪费。
针对这个现象,virtio又设计了 virtio_pci
模块,以处理所有virtio设备的共性部分。这样一来,所有的virtio设备,在系统层面看来,都是一个pci设备,其设备驱动都是virtio_pci。
但是,virtio_pci 并不能完整的驱动任何一个设备。
因此,virtio_pci
在probe(接管)每一个设备时,根据每个pci设备的subsystem device
id来识别出这具体是哪一种virtio设备,然后相应的向内核注册一个 virtio
设备。见 include/uapi/linux/virtio_ids.h 。
1
2
3
4
5
6
7
8
9
10
11
12
13
14virtio_config_ops 结构变量来适配。
在启动virtio device后,Guest OS中不但在 /sys/bus/pci/devices
中出现一个对应的pci设备,而且在 /sys/bus/virtio/devices
中也会出现一个virtio类型设备。
Guest OS在初始化过程中会扫描pci bus num = 0的host
bridge,也就是北桥,通过它来发现其下挂载的一系列pci设备(包括桥设备),因此新的virtio设备必须对外展现出一个pci的接口。
如果QEMU成功模拟了一个挂在host bridge上的pci设备,那么Guest
OS将会通过PCI总线扫描发现之,继而把该设备添加到系统中,会在
/sys/bus/pci/devices 目录下出现一个新的pci设备。
在 virtio-pci PCI设备probe时候,在
virtio_pci_probe() 函数(源码在
drivers/virtio/virtio_pci_common.c)中,它将调用
register_virtio_device(),后者将把一个virtio类型(struct virtio_device)的设备加入到系统,由于该设备所属的总线是struct bus_type virtio_bus(源码在
drivers/virtio/virtio.c ), 导致
/sys/bus/virtio/devices/ 目录下出现一个新的设备。
代码层次结构
从虚拟机的角度看,virtio的类层次结构如下图所示。
在顶级的是 virtio_driver,它在Guest
OS中表示前端驱动程序Front-End简称FE。与该驱动程序匹配的设备由
virtio_device(设备在虚拟机操作系统中的表示)封装。这引用
virtio_config_ops 结构(它定义配置
virtio device的操作)。 virtio_device 由
virtqueue 引用。最后,每个 virtqueue 对象引用
virtqueue_ops 对象,后者定义处理 hypervisor
的驱动程序的底层队列操作。这里需要说明的是,Linux并没有实现论文中的
struct virtqueue_ops,但是实现了对于virtqueue操作的函数。下面会讲到。
virtio_driver
1 | // https://elixir.bootlin.com/linux/v4.15.4/source/include/linux/virtio.h |
该流程以创建 virtio_driver 并通过
register_virtio_driver 进行注册开始。
virtio_driver
结构定义上层设备驱动程序(struct device_driver driver)、驱动程序支持的设备
ID
的列表(struct virtio_device_id *id_table)、一个特性表单(取决于设备类型)(feature_table)和一个回调函数列表。
当 hypervisor 识别到与设备列表中的设备 ID 相匹配的新设备时,将调用
probe 函数(由 virtio_driver 对象提供)来传入
virtio_device
对象。将这个对象和设备的管理数据缓存起来(以独立于驱动程序的方式缓存)。可能要调用
virtio_config_ops函数来获取或设置特定于设备的选项,例如,为
virtio_blk 设备获取磁盘的
Read/Write状态或设置块设备的块大小,具体情况取决于启动器的类型。
virtio_device
1 | // include/linux/virtio.h |
注意,virtio_device 不包含到 virtqueue
的引用(但 virtqueue 确实引用了
virtio_device)。要识别与该 virtio_device
相关联的 virtqueue,需要结合使用
virtio_config_ops 对象和 find_vq
函数。该对象返回与这个 virtio_device
实例相关联的虚拟队列。find_vq 函数还允许为
virtqueue 指定一个回调函数。
virtio_driver 有自己的PCI总线 virtio_bus。
probe函数用于PCI总线发现设备。比如启动
virtio_blk
时,当通过qemu启动guest的时候如果指定-device virtio-blk-device,就会调用virtio_blk的
virtblk_probe 函数。
virtio_config_ops
对于 virtio device
需要指定操作函数,包括PCI配置空间设置和读取,status操作,virtqueue操作,和总线bus操作。
1 | /* include/linux/virtio_config.h */ |
virtqueue
1 | /* include/linux/linux/virtio.h */ |
virtqueue 是
Guest操作系统内存的一部分,用作Guest和Host的数据传输缓存。
Host可以在Userspace实现(QEMU),也可以在内核态实现(vHost)。
它包括了一个可选的回调函数(在 hypervisor 使用缓冲池时调用)、一个到
virtio_device
的引用、队列的索引,以及一个引用要使用的底层实现的特殊 priv
引用。虽然 callback
是可选的,但是它能够动态地启用或禁用回调。
virtqueue数量由设备实现确定,比如网卡有两个virtqueue,一个用于接收数据,另一个用于发送数据。
针对 virtqueue
的操作包括add_buf、kick、get_buf、disable_cb、enable_cb等,定义了在guest操作系统和
hypervisor 之间移动命令和数据的方式:
add_buf
1 | /* drivers/virtio/virtio_ring.c */ |
add_buf()用于向 queue 中添加一个新的 buffer,参数 data 是一个非空的令牌,用于识别 buffer,当 buffer 内容被消耗后,data 会返回。
该请求以散集列表(scatter-gather list)的形式存在。对于
add_buf,guest操作系统提供用于将请求添加到队列的
virtqueue、散集列表(地址和长度数组)、用作输出条目(目标是底层
hypervisor)的缓冲池数量,以及用作输入条目(hypervisor
将为它们储存数据并返回到guest操作系统)的缓冲池数量,以及数据。
- kick & notify
1
2
3
4
5
6
7
8
9
10
11
12
13
14
15
16
17
18
19
20
21
22
23
24/**
* virtqueue_kick - update after add_buf
* @vq: the struct virtqueue
*
* After one or more virtqueue_add_* calls, invoke this to kick
* the other side.
*/
bool virtqueue_kick(struct virtqueue *vq);
/**
* virtqueue_kick_prepare - first half of split virtqueue_kick call.
* @vq: the struct virtqueue
*
* Instead of virtqueue_kick(), you can do:
* if (virtqueue_kick_prepare(vq))
* virtqueue_notify(vq);
*
* This is sometimes useful because the virtqueue_kick_prepare() needs
* to be serialized, but the actual virtqueue_notify() call does not.
*/
bool virtqueue_kick_prepare(struct virtqueue *_vq);
/**
* virtqueue_notify - second half of split virtqueue_kick call.
*/
bool virtqueue_notify(struct virtqueue *vq);
当通过 add_buf 向 hypervisor 发出请求时,guest操作系统能够通过
kick 函数通知 hypervisor
新的请求。为了获得最佳的性能,guest操作系统应该在通过 kick
发出通知之前将尽可能多的缓冲池装载到 virtqueue。Guest 再调用
virtqueue_notify()来通知 host。
- get_buf()
1 | /** |
Guest OS仅需调用该函数或通过提供的 virtqueue callback
函数等待通知就可以实现轮询。当Guest OS知道缓冲区可用时,调用 get_buf
返回完成的缓冲区。
该函数返回使用过的 buffer,len 为写入到 buffer 中数据的长度。获取数据,释放 buffer,更新 vring 描述符表格中的 index。
- virtqueue_disable_cb()
1 | /** |
示意 guest 不再需要再知道一个 buffer 已经使用了,也就是关闭 device
的中断。
驱动会在初始化时注册一个回调函数(在 virtqueue 中由 virtqueue 初始化的
callback 函数),disable_cb()通常在这个 virtqueue
回调函数中使用,用于关闭再次的回调发生。
- virtqueue_enable_cb()
1 | /** |
与 disable_cb()刚好相反,用于重新开启设备中断的上报。
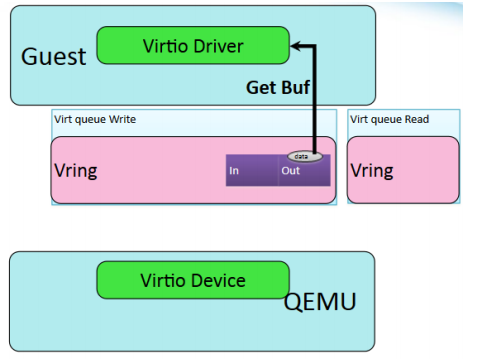
host与guest操作系统之间数据交换流程
- guest 添加数据
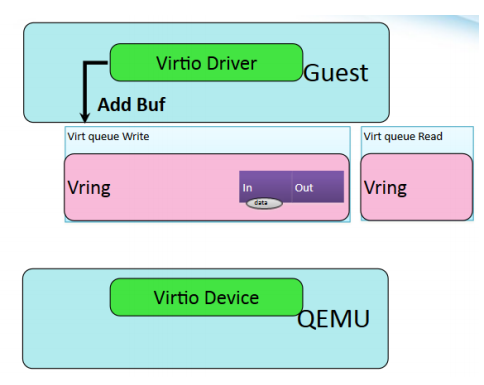
- guest 通知 host
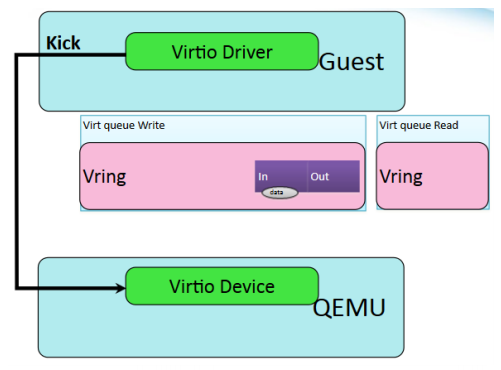
- host读取缓存数据
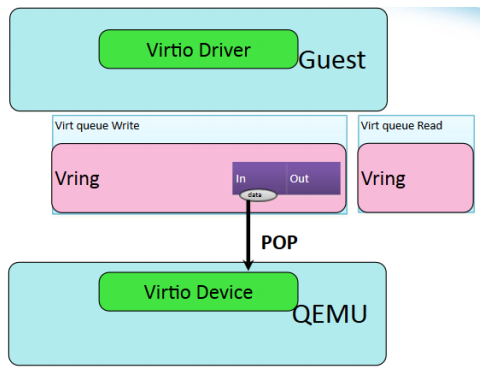
- host写入缓存数据
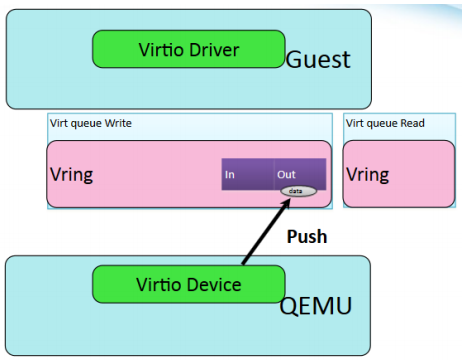
- guest读取返回数据
virtio_ring
- VirtIO实现原理——vring数据结构
- Virtual I/O Device (VIRTIO) Version 1.0
guest 操作系统(前端)驱动程序通过virtqueue与 hypervisor
交互,实现数据的共享。对于 I/O,guest
操作系统提供一个或多个表示请求的缓冲池。
vring 是 virtqueue
的具体实现方式,在host和guest操作系统之间作内存映射,针对
vring 会有相应的描述符表格进行描述。
前后端驱动通过 vring 直接通信,这就绕过了经过 KVM
内核模块的过程,达到提高 I/O 性能的目的。
框架如下图所示:
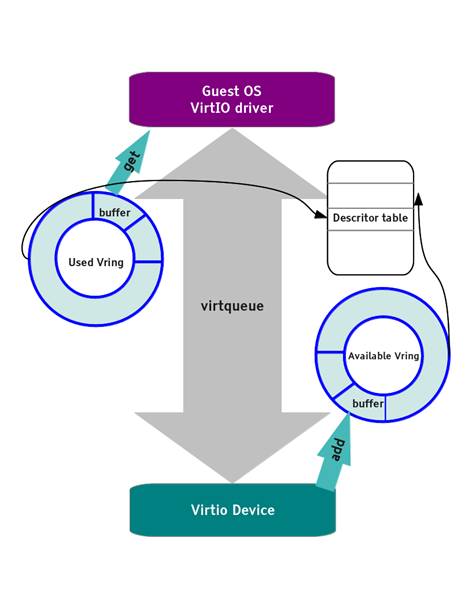
virtio_ring 是 virtio 传输机制的实现,vring 引入
ring buffers 来作为数据传输的载体。
从结构上看,virtio_ring 包含 3 部分:
- Descriptor Table - Available Ring - Used Ring
- Descriptor Table
描述符数组(descriptor
table)用于存储真正的buffer,每个描述符都是一个对 buffer
的描述,包含一个 address/length
的配对、下个buffer的指针、两个标志位(下个buffer是否有效和当前buffer是可读/写)。
每个buffer在内部被表示为一个散集列表(scatter-gather),列表中的每个条目表示一个地址和一个长度。
每个条目的结构体为 struct vring_desc,desc table数组大小为
Queue Size。
1
2
3
4
5
6
7
8
9
10
11
12
13
14
15
16
17
18
19/* include/uapi/linux/virtio_ring.h*/
/* Virtio ring descriptors: 16 bytes. These can chain together via "next". */
struct vring_desc {
/* Address (guest-physical). */
__virtio64 addr;
/* Length. */
__virtio32 len;
/* This marks a buffer as continuing via the next field. */
/* This marks a buffer as device write-only (otherwise device read-only). */
/* This means the buffer contains a list of buffer descriptors. */
/* The flags as indicated above. */
__virtio16 flags;
/* We chain unused descriptors via this, too */
/* next desc idx */
__virtio16 next;
};
- available ring
available ring用于 guest 端表示哪些描述符链(descriptor
chain)当前是可用的。
available ring由 driver 写,device 读。
idx 表示driver把下一个 descriptor entry
放在ring中的位置。
1 | struct virtq_avail { |
flags:用于指示Host当它处理完buffer,将Descriptor
index写入Used
Ring之后,是否通过注入中断通知Guest。如果flags设置为0,Host每处理完一次buffer就会中断通知Guest;如果flags为1,不通知Guest。
如果VIRTIO_F_EVENT_IDX该特性开启,那么flags的意义将会改变,Guest必须把flags设置为0,然后通过
used_event 机制实现通知。 idx :
指示Guest下一次添加buffer时,在ring[]中取的位置,从0开始。
ring[]:是一个大小为 Queue Size
的数组,entry是存放Descriptor Table Chain的head。
used_event
用作Event方式通知机制,此值用于控制Guest的virtqueue数据发送速度,是QEMU处理avail
ring 后的last_avail_idx。
struct vring_avail 的定义如下:
1 | /*include/uapi/linux/virtio_ring.h*/ |
- Used Ring
used ring表示 device记录哪些描述符已经使用。
used ring 由device 写,driver读取。
1 | struct virtq_used { |
每个used ring中条目 struct virtq_used_elem 中
id 指定了在 descriptor chain 中的 head 条目,而 len
指定了要写入buffer的字节数。
而 struct virtq_used 中的 flags
用于指示Guest当它添加完buffer,将Descriptor index写入Avail
Ring之后,是否发送notification通知Host。如果flags设置为0,Guest每增加一次buffer就会通知Host,如果flags为1,不通知Host。
当 VIRTIO_F_EVENT_IDX
特性开启时,flags必须被设置成0,Guest使用avail_event方式通知Host。
idx 用于指示Host下一次处理的buffer在Used
Ring所的位置。
ring[]:是一个大小为 Queue Size
的数组,entry是存放Descriptor Table Chain的head。
avail_event 用作Event方式通知机制。
而 struct vring_used 定义并不包括
avail_event。
1 | /*include/uapi/linux/virtio_ring.h*/ |
- vring
需要注意的是,vring的具体内存分布和定义不同,真实内存分布也包括了Descriptor
Table,Avail Ring和Used Ring,为了对齐还包括padding,具体为:
1
2
3
4
5
6
7
8
9
10
11
12
13
14
15
16
17
18
19
20struct vring
{
// The actual descriptors (16 bytes each)
struct vring_desc desc[num];
// A ring of available descriptor heads with free-running index.
__virtio16 avail_flags;
__virtio16 avail_idx;
__virtio16 available[num];
__virtio16 used_event_idx;
// Padding to the next align boundary.
char pad[];
// A ring of used descriptor heads with free-running index.
__virtio16 used_flags;
__virtio16 used_idx;
struct vring_used_elem used[num];
__virtio16 avail_event_idx;
}
缓冲区的格式、顺序和内容仅对前端和后端驱动程序有意义,FE和BE必须按此分布。
struct vring定义与真实内存分布不同,仅仅记录了queue
size和各自得指针。
1
2
3
4
5
6
7
8/*include/uapi/linux/virtio_ring.h*/
struct vring {
// qeueue size
unsigned int num; // ring num is a power of 2
struct vring_desc *desc;
struct vring_avail *avail;
struct vring_used *used;
};
从 vring_init() 和 vring_size()
两个函数可以清楚得得出vring内存分布。
1 | static inline void vring_init(struct vring *vr, unsigned int num, void *p, |
struct vring_virtqueue
Driver和Device看到的只是virtqueue,而vring是virtqueue的具体实现,vring_virtqueue
将vring的实现隐藏在了virtqueue下面。
vring_virtqueue 关联了 virtqueue 和
vring,并记录了ring的head和last_used_id等。
1 | struct vring_desc_state { |
VIRTIO_RING_F_INDIRECT_DESC 决定了
struct vring_virtqueue->indirect,即Description
Table使用二级索引来记录buffer。
即申请并构建Description Chain来保存buffer,再将此Description
Chain的地址和大小添加到vring中的条目。
qemu vring实现
1 | vm_setup_vq() |
一个逻辑buffer可能不是物理内存连续的,因此可能由多个内存块组成。
qemu中用 VirtQueueElement 结构表示一个逻辑buffer。
涉及到VRing,用 VRingDesc
结构描述一个物理内存块,用一个描述符数组集中管理所有的描述符。而前后端的配合通过两个ring来实现:VRingAvail和
VRingUsed,与FE的VRing描述一致。
过程:
当HOST需要向客户机发送数据时,先从对应的virtqueue获取客户机设置好的buffer空间(实际的buffer空间由客户机添加到virtqueue),每次取出一个buffer,相关信息记录到
VirtQueueElement
结构中,然后对其进行地址映射,因为这里记录的buffer信息是客户机的物理地址,需要映射成HOST的虚拟地址才可以对其进行访问。每完成一个
VirtQueueElement 即buffer的的写入,就需要记录
VirtQueueElement相关信息到VRingUsed,并撤销地址映射。一个buffer写入完成后会设置VRingUsed的idx字段并对客户机注入软件中断以通知客户机。
1 | /* hw/virtio/virtio.c */ |
Descriptor Table记录的某一buffer占用VRingDesc
entry可以通过len计算,即
len/sizeof(VRingDesc)。
1 | typedef struct VRingAvail |
需要重点关注的字段,last_avail_index 对应 VRingAvail中
ring[]数组的下标,表示上次最后使用的一个buffer首个desc对应的ring[]中的下标。
1 | typedef struct VirtQueueElement |
其中,in_addr 和 out_addr
两个数组保存的是客户机的物理地址,而 in_sg 和
out_sg 中的地址是host的虚拟地址,两者之间需要映射。
index
记录该逻辑buffer块的首个物理内存块对应的描述符在描述符表中的下标,out_num和
in_num 是指输出(可读)和输入(可写)块的数量。
virtqueue_pop()
1 | /* hw\virtio\virtio.c */ |
virtqueue_push()
virtqueue_push() 将 VirtQueueElement *elem
添加到VQ中然后再刷新 Used Ring。
分成了 fill 和 flush 两部分。
1 | void virtqueue_push(VirtQueue *vq, const VirtQueueElement *elem, |
virtqueue_fill()
将取消VirtQueueElement映射的buffer,并将VirtQueueElement写入Used
Ring中。
1 | void virtqueue_fill(VirtQueue *vq, const VirtQueueElement *elem, |
virtqueue_flush() 重新设置Used
Ring的idx,vq->signalled_used 在
virtqueue_notify()
中设置,记录的是vq->used_idx。
1 | void virtqueue_flush(VirtQueue *vq, unsigned int count) |
virtio 数据传输实例
这篇博客图文并茂,讲解的非常详细了。
vring event
VIRTIO中的前后端配合限速分析
virtIO前后端notify机制详解
2016-11-15
- Guest 2 Host
在Guest virtqueue_kick_prepare() 中
1
2
3
4
5
6
7
8
9old = vq->avail_idx_shadow - vq->num_added;
new = vq->avail_idx_shadow;
vq->num_added = 0;
if (vq->event) {
needs_kick = vring_need_event(virtio16_to_cpu(_vq->vdev, vring_avail_event(&vq->vring)), new, old);
} else {
needs_kick = !(vq->vring.used->flags & cpu_to_virtio16(_vq->vdev, VRING_USED_F_NO_NOTIFY));
}
new 表示avail
ring中下一次添加buffer的idx,而old表示avail
ring中上一次添加buffer的idx。
1 | /* include/uapi/linux/virtio_ring.h */ |
event_idx是从 Used Ring获取的
avail_event,avail_event 是QEMU处理完avail
ring之后通知Guest其处理的进度。
如果event_idx超前于上次添加avail
ring的位置,说明后端处理较快,如下图所示,则进行通知(kick),否则,不通知。
|---|old|-----|event_idx|----|new_idx|------|
avail_event在QEMU中的 virtqueue_pop()
设置,将VQ中上次处理的Avail Ring中的idx写回Used Ring中:
1 | /* qemu/hw/virtio/virtio.c */ |
- Host 2 Guest
首先,如果队列为空即当前没有可用buffer了,那么必然会notify前端。
其次判断是否支持这样事件触发式的方式即
VIRTIO_RING_F_EVENT_IDX,如果不支持,就通过flags字段来判断。而如果支持,就通过事件触发来通知。
最后,判断 v = vq->signalled_used_valid 和
vring_need_event(vring_get_used_event(vq), new, old)。
v = vq->signalled_used_valid
在初始化的时候被设置成false,表示还没有向前端做任何通知,而后再每次的
virtio_should_notify()中就会设置成true,并更新vq->signalled_used = vq->used_idx;
old 是上次调用notify更新的
vq->used_idx值;
new 是在 virtqueue_flush() 之后更新的Used
Ring的idx。
vring_get_used_event(vq)获取了Avail
Ring中保存的used_event,该值在客户机driver中virtqueue_get_buf_ctx()被设置。
vring_need_event() 与 Guest2Host中的判断方式一致。
1 | static bool virtio_should_notify(VirtIODevice *vdev, VirtQueue *vq) |
在 Guest 中,virtqueue_get_buf_ctx() 会处理Used
Ring,每次取出buffer后将 vq->last_used_idx 写入到 Used
Ring的event中。
1 | /* drivers/virtio/virtio_ring.c */ |
virtio pci notify机制
- Guest 2 Host
Guest若要通知QEMU,会调用
virtqueue_kick->virtqueue_notify,而virtqueue结构中绑定的notify函数是vp_notify,在创建virtqueue是通过实参传递。
1 | /* drivers/virtio/virtio_pci_legacy.c */ |
通知方式通过PCI IO寄存器VIRTIO_PCI_QUEUE_NOTIFY 写入了
VQ的id。
再后端QEMU处理此PCI IO寄存器:
1
2
3
4
5
6
7
8
9
10
11
12
13
14
15
16
17
18
19
20
21
22
23
24
25
26
27
28
29
30
31
32
33
34
35
36
37
38
39
40/* hw/virtio/virtio-pci.c */
static void virtio_ioport_write(void *opaque, uint32_t addr, uint32_t val)
{
...
case VIRTIO_PCI_QUEUE_PFN:
pa = (hwaddr)val << VIRTIO_PCI_QUEUE_ADDR_SHIFT;
if (pa == 0) {
virtio_pci_reset(DEVICE(proxy));
}
else
virtio_queue_set_addr(vdev, vdev->queue_sel, pa);
break;
case VIRTIO_PCI_QUEUE_SEL:
if (val < VIRTIO_QUEUE_MAX)
vdev->queue_sel = val;
break;
case VIRTIO_PCI_QUEUE_NOTIFY:
if (val < VIRTIO_QUEUE_MAX) {
virtio_queue_notify(vdev, val);
}
break;
...
}
/* hw/virtio/virtio.c */
void virtio_queue_notify(VirtIODevice *vdev, int n)
{
VirtQueue *vq = &vdev->vq[n];
if (unlikely(!vq->vring.desc || vdev->broken)) {
return;
}
trace_virtio_queue_notify(vdev, vq - vdev->vq, vq);
if (vq->handle_aio_output) {
event_notifier_set(&vq->host_notifier);
} else if (vq->handle_output) {
vq->handle_output(vdev, vq);
}
}
此处仅仅调用了VirtQueue结构中绑定的处理函数handle_output,而handle_output通过virtio_add_queue()
进行的绑定。
该handle_output()函数根据不同的设备有不同的实现,比如网卡有网卡的实现,而块设备有块设备的实现。
以 virtio-serial-bus.c
为例,对于数据传输的VQ,handle_output() 调用了
do_flush_queued_data(),此函数对数据进行pop,push,notify。
1 | /* hw/virtio/virtio.c */ |
- Host 2 Guest
virtqueue_notify() 先判断是否需要更新,如果需要则通过
virtio_irq() 通知。
virtio_should_notify()涉及到了前后端配合限速更新,与Guest中的限速相似,但是也略有不同。
1 | /* hw/virtio/virtio.c */ |
而 VirtioBusClass *k->notify 关联的函数为
virtio_pci_notify() 。
在 virtio_pci_bus_class_init() 初始化。 1
2
3
4
5
6
7
8
9
10
11
12
13
14
15
16
17
18
19
20/* hw/virtio/virtio-pci.c */
static void virtio_pci_bus_class_init(ObjectClass *klass, void *data)
{
BusClass *bus_class = BUS_CLASS(klass);
VirtioBusClass *k = VIRTIO_BUS_CLASS(klass);
k->notify = virtio_pci_notify;
...
}
static void virtio_pci_notify(DeviceState *d, uint16_t vector)
{
VirtIOPCIProxy *proxy = to_virtio_pci_proxy_fast(d);
if (msix_enabled(&proxy->pci_dev))
msix_notify(&proxy->pci_dev, vector);
else {
VirtIODevice *vdev = virtio_bus_get_device(&proxy->bus);
pci_set_irq(&proxy->pci_dev, atomic_read(&vdev->isr) & 1);
}
}virtio_pci_notify() 设置中断来通知Guest。
virtio的使用
由于传统的QEMU/KVM方式是使用QEMU纯软件模拟I/O设备(网卡、磁盘、显卡),导致效率并不高。在KVM中,可以在客户机使用半虚拟化(paravirtualized drivers)来提高客户机的性能。
QEMU模拟I/O设备的基本原理
当客户机的设备驱动程序(Device Driver)发起I/O请求时,KVM模块中的I/O操作捕获代码会拦截这次I/O请求,然后经过处理后将本次I/O请求的信息存放到I/O共享页(sharing page),并通知用户控件的QEMU程序。QEMU模拟程序获得I/O操作的具体信息后,交给硬件模拟代码(Emulation Code)来模拟出本次的I/O操作,完成后把结果放回I/O共享页中,并通知KVM模块中的I/O操作捕获代码。最后由KVM模块中的捕获代码读取I/O共享页中的操作结果,把结果返回给客户机中。当然,这个操作过程中客户机作为一个QEMU进程在等待I/O时也可能被阻塞。
另外,当客户机通过DMA访问大块I/O时,QEMU模拟程序不会把操作结果放到I/O共享页中,而是通过内存映射的方法将结果直接写到客户机的内存去,然后通过KVM模块高速客户机DMA操作已经完成。
QEMU模拟I/O设备不需要修改客户端操作系统,可以模拟各种各样的硬件设备,但是每次I/O操作的路径比较长,有太多的VMEntry和VMExit发生,需要多次上下文切换(context switch),多次的数据复制。性能方面很差。
virtio 有分为guest 中的前端程序和qemu中的后端程序。 virtio中的五种前端程序为
virtio-blk:/drivers/block/virtio-blk.c virtio-net:/drivers/net/virtio-net.c virtio-pci:/drivers/virtio/virtio-pci.c virtio-ballon:/drivers/virtio/virtio-ballon.c virtio-console:/drivers/virtio/virtio-console.c
这五种往下调用/drivers/virtio/virtio.c ->
/drivers/virtio/virtio_ring.c
总结一下virtio的flow:guest->qemu->host kernel ->hw,如下图所示。
使用virtio_net
为了让虚拟机能够与外界通信,QEMU为虚拟机提供了网络设备,支持的网络设备为:ne2k_pci,i82551,i82557b,i82559er,rtl8139,e1000,pcnet,virtio。
虚拟机的网络设备连接在QEMU虚拟的VLAN中。每个QEMU的运行实例是宿主机中的一个进程,而每个这样的进程中可以虚拟一些VLAN,虚拟机网络设备接入这些VLAN中。当某个VLAN上连接的网络设备发送数据帧,与它在同一个VLAN中的其它网路设备都能接收到数据帧。对虚拟机的网卡没有指定其连接的VLAN号时,QEMU默认会将该网卡连入vlan0。
使用virtio_net半虚拟化驱动,可以提高网络吞吐量(throughput)和降低网络延迟(latency),达到原生网卡的性能。
使用virtio_net需要宿主机中的QEMU工具和客户机的virtio_net驱动支持。
检查QEMU是否支持virtio类型的网卡
1 | # qemu-system-x86_64 -net nic,model=? |
从输出的支持网卡类型可知,当前qemu-kvm支持virtio网卡类型。
配置虚拟网桥
本系统的网卡为enp4s0,启动了DHCP。[6]
1 | sudo ifconfig enp4s0 down # 关闭enp4s0接口,之后ifconfig命令不显示enp4s0接口 |
查看虚拟网桥列表 1
sudo brctl show br0
bridge name bridge id STP enabled interfaces
br0 8000.60a44ce7203e no enp4s0查看br0的各个接口信息 1
sudo brctl showstp br0
enp4s0 (1)
port id 8001 state forwarding
designated root 8000.60a44ce7203e path cost 4
designated bridge 8000.60a44ce7203e message age timer 0.00
designated port 8001 forward delay timer 0.00
designated cost 0 hold timer 0.00
flags 配置TAP设备操作:
1 | sudo tunctl -t tap1 # 创建一个tap1接口,默认允许root用户访问 |
显示br0的各个接口 1
sudo brctl showstp br0
br0
bridge id 8000.46105353cee8
designated root 8000.46105353cee8
root port 0 path cost 0
max age 20.00 bridge max age 20.00
hello time 1.00 bridge hello time 1.00
forward delay 1.00 bridge forward delay 1.00
ageing time 300.00
hello timer 0.00 tcn timer 0.00
topology change timer 0.00 gc timer 98.28
flags
enp4s0 (1)
port id 8001 state forwarding
designated root 8000.46105353cee8 path cost 4
designated bridge 8000.46105353cee8 message age timer 0.00
designated port 8001 forward delay timer 0.00
designated cost 0 hold timer 0.00
flags
tap1 (2)
port id 8002 state disabled
designated root 8000.46105353cee8 path cost 100
designated bridge 8000.46105353cee8 message age timer 0.00
designated port 8002 forward delay timer 0.00
designated cost 0 hold timer 0.00
flags 为了在系统启动时能够自动配置虚拟网桥和TAP设备,需要重新编辑/etc/network/interfaces。
1
2
3
4
5
6
7
8
9
10
11
12
13
14
15
16
17
18
19
20
21
22
23
24auto enp4s0
iface enp4s0 inet dhcp
auto br0
iface br0 inet dhcp
#iface br0 inet static
#address 192.168.0.1
#netmask 255.255.255.0
#gateway 192.168.0.254
#dns-nameserver 8.8.8.8
bridge_ports enp4s0
bridge_fd 1
bridge_hello 1
bridge_stp off
auto tap0
iface tap0 inet manual
#iface tap0 inet static
#address 192.168.0.2
#netmask 255.255.255.0
#gateway 192.168.0.254
#dns-nameserver 8.8.8.8
pre-up tunctl -t tap0 -u root
pre-up ifconfig tap0 0.0.0.0 promisc up
post-up brctl addif br0 tap0
当然还可以参考7,写脚本来设置网络。
启动客户机,指定分配virtio网卡设备
1 | sudo qemu-system-x86_64 -enable-kvm -boot c -drive file=ubuntu16.04.qcow2,if=virtio -m 1024 -netdev type=tap,ifname=tap1,script=no,id=net0 -device virtio-net-pci,netdev=net0 |
qemu-system-x86-64命令行解释
–enable-kvm创建x86的虚拟机需要用到qemu-system-x86_64这个命令,并需要加上–enable-kvm来支持kvm加速,不适用KVM加速虚拟机会非常缓慢。boot磁盘相关参数,设置客户机启动时的各种选项。c表示第一个硬盘。drive配置驱动。使用file文件作为镜像文件加载到客户机的驱动器中。if指定驱动器使用的接口类型,包括了virtio在内。m设置客户机内存大小,单位默认为MB。也可以用G为单位。netdev新型的网络配置方法,在宿主机中建立一个网络后端驱动。TAP是虚拟网络设备,它仿真了一个数据链路层设备。TAP用于创建一个网络桥,使用网桥连接和NAT模式网络的客户机都会用到TAP参数。ifname指接口名称。script用于设置宿主机在启动客户机时自动执行的网络配置脚本,如果不指定,默认为/etc/qemu-ifup,如果不需要执行脚本,则设置script=no。id用于在宿主机中指定的TAP虚拟设备的ID。device为虚拟机添加设备。这里添加了virtio-net-pci设备,使用了net0的TAP虚拟网卡。
1 | -device driver[,prop[=value][,...]] |
virtio Serial
串口通信的样例代码是: 1
2
3-device virtio-serial-pci \
-chardev socket,path=/tmp/foo,server,nowait,id=foo \
-device virtserialport,chardev=foo,name=org.fedoraproject.port.0
QEMU的chardev分为backend和frontend。这会向guest创建设备并暴露出串口端口。
-device virtio-serial 选项向虚拟机添加了
virtio-serial-pci
设备,-chardev socket,path=/tmp/foo,server,nowait,id=foo
创建了backend,以 /tmp/foo 为path的 UNIX
SOCKET用于通信,id为 foo。
-device virtserialport,chardev=foo,name=org.fedoraproject.port.0
创建了frontend,它打开了为此设备打开了一个端口,端口名称为“org.fedoraproject.port.0”,并且将foo的chardev
添加到那个port。 来自QEMU
(简体中文) #Copy and paste
客户端需要载入 virtio_console.ko 内核模块并将端口
/dev/vport0p1 提供给用户态程序。 文件系统属性的位置在
/sys/class/virtio-ports/vport0p1/name ,它包含了文本
“org.fedoraproject.port.0”。 添加udev规则,在
/dev/virtio-ports
中添加一条链接,/dev/virtio-ports/org.fedoraproject.port.0 -> /dev/vport0p1
,写入主机 /tmp/foo
的数据会被转发到虚拟机,虚拟机中的应用程序就能够从
/dev/vport0p1 或者
/dev/virtio-ports/org.fedoraproject.port.0 中读数据。
/dev/vportNp0 为首个 virtio console 预留。
从kvm
-chardev中可以得到-chardev 的选项。
或者从help 选项获取,如下 1
2
3
4
5-chardev socket,id=id[,host=host],port=port[,to=to][,ipv4][,ipv6][,nodelay][,reconnect=seconds]
[,server][,nowait][,telnet][,reconnect=seconds][,mux=on|off]
[,logfile=PATH][,logappend=on|off][,tls-creds=ID] (tcp)
-chardev socket,id=id,path=path[,server][,nowait][,telnet][,reconnect=seconds]
[,mux=on|off][,logfile=PATH][,logappend=on|off] (unix)path
路径是否设置。
检查客户端是否启用 virtio_console.ko
检查内核模块是否包含virtio。 1
grep -i virtio /boot/config-$(uname -r)
CONFIG_NET_9P_VIRTIO=m
CONFIG_VIRTIO_BLK=y
CONFIG_SCSI_VIRTIO=m
CONFIG_VIRTIO_NET=y
CONFIG_CAIF_VIRTIO=m
CONFIG_VIRTIO_CONSOLE=y
CONFIG_HW_RANDOM_VIRTIO=m
CONFIG_DRM_VIRTIO_GPU=m
CONFIG_VIRTIO=y
# Virtio drivers
CONFIG_VIRTIO_PCI=y
CONFIG_VIRTIO_PCI_LEGACY=y
CONFIG_VIRTIO_BALLOON=y
CONFIG_VIRTIO_INPUT=m
CONFIG_VIRTIO_MMIO=y
CONFIG_VIRTIO_MMIO_CMDLINE_DEVICES=yCONFIG_VIRTIO_CONSOLE=y 表示
virtio_console.ko
已经编译到内核中,默认启动,不用作为可加载模块载入。
QEMU客户端模式的 UNIX chardev
启动的参数为: 1
2
3
4...
-chardev socket,path=/tmp/foo,id=foo \
-device virtio-serial-pci
-device virtserialport,chardev=foo,name=maxwell,nr=2 \
需要先在host上启动监听进程: 1
socat UNIX-LISTEN:/tmp/foo -
启动guest之后,在guest中向设备输入字符串: 1
echo foo > /dev/virtio-ports/maxwell
QEMU服务器模式的 UNIX chardev
1 | ... |
需要先在host上启动监听进程,这里使用 ipython 交互程序:
1
2
3
4
5import socket
sock = socket.socket(socket.AF_UNIX)
sock.connect("/tmp/foo")
print sock.recv(1024) 1
printf 'abcd' | dd bs=4 status=none of=/dev/virtio-ports/maxwell count=1 seek=0
这里还提到用管道的方式传输数据,我就不在这里实验了。
Features/VirtioSerial Features/ChardevFlowControl 字符设备控制流 KVM中Virtio-serial_API
qemu创建虚拟机
qemu-img创建虚拟机镜像
虚拟机镜像用来模拟虚拟机的硬盘,在启动虚拟机之前需要创建镜像文件。qemu-img是QEMU的磁盘管理工具,可以用qemu-img创建虚拟机镜像。
1
qemu-img create -f qcow2 ubuntu.qcow2 20G
-f选项用于指定镜像的格式,qcow2格式是QEMU最常用的镜像格式,采用来写时复制技术来优化性能。ubuntu.qcow2是镜像文件的名字,20G是镜像文件大小。镜像文件创建完成后,可使用qemu-system-x86来启动x86架构的虚拟机
检查KVM是否可用
QEMU使用KVM来提升虚拟机性能,如果不启用KVM会导致性能损失。要使用KVM,首先要检查硬件是否有虚拟化支持:
1
grep -E 'vmx|svm' /proc/cpuinfo
1
lsmod | grep kvm
如果没有 kvm_intel
模块,再使用kvm功能启动QEMU客户端会报错: > Could not access KVM
kernel module: No such file or directory > qemu-system-x86_64: failed
to initialize KVM: No such file or directory
安装模块 modprobe kvm-intel 得到错误信息: >
modprobe: ERROR: could not insert 'kvm_intel': Operation not
supported
对于内核错误,通过查看日志文件找问题。 dmesg > kvm:
disabled by bios
那么好,关机,启动后设置BIOS,设置完成后一定要关机,再启动。万万不可重启。
安装操作系统。
准备好虚拟机操作系统ISO镜像。执行下面的命令启动带有cdrom的虚拟机:
1
qemu-system-x86_64 -m 2048 -enable-kvm ubuntu.qcow2 -cdrom ubuntu.iso
-m指定虚拟机内存大小,默认单位是MB, -
-enable-kvm使用KVM进行加速, -
-cdrom添加ubuntu的安装镜像。
可在弹出的窗口中操作虚拟机,安装操作系统,安装完成后重起虚拟机便会从硬盘(ubuntu.qcow2 )启动。
启动虚拟机
启动虚拟机只需要执行: 1
qemu-system-x86_64 -m 2048 -enable-kvm ubuntu.qcow2
qemu monitor
QEMU
监控器是终端窗口,可以执行一些命令来查看当前启动的操作系统一些配置和运行状况。
可以通过 -monitor stdio 参数启动。
或者在QEMU窗口中使用快捷键 Ctrl+Alt+2, 使用
Ctrl+Alt+1 切换回普通的客户机。
VM Screen Resolution
在启动项中添加 -vga virtio,
提供了很高的resolution,然后 Ctrl + Alt + F
或者在启动项中添加 -full-screen 即可。
How
to increase the visualized screen resolution on QEMU / KVM?
参考
- Virtio
- QEMU how to setup Tun/Tap + bridge networking
- QEMU 1: 使用QEMU创建虚拟机
- Virtio: towards a de factor standard for virtual I/O devices
- 访问qemu虚拟机的五种姿势
- qemu虚拟机与外部网络的通信
- Configuring Guest Networking
- Virtio:针对 Linux 的 I/O 虚拟化框架
- Virtio 基本概念和设备操作
- virtio: Towards a De-Facto Standard For Virtual I/O Devices
- Virtio
- Virtio Spec Overview